Looking good Paz. Good things come to those that wait and then spend lots of money.
Frank
1977 3.5 Sport Restoration
Re: 1977 3.5 Sport Restoration
V Twins howl in the morning!

Re: 1977 3.5 Sport Restoration
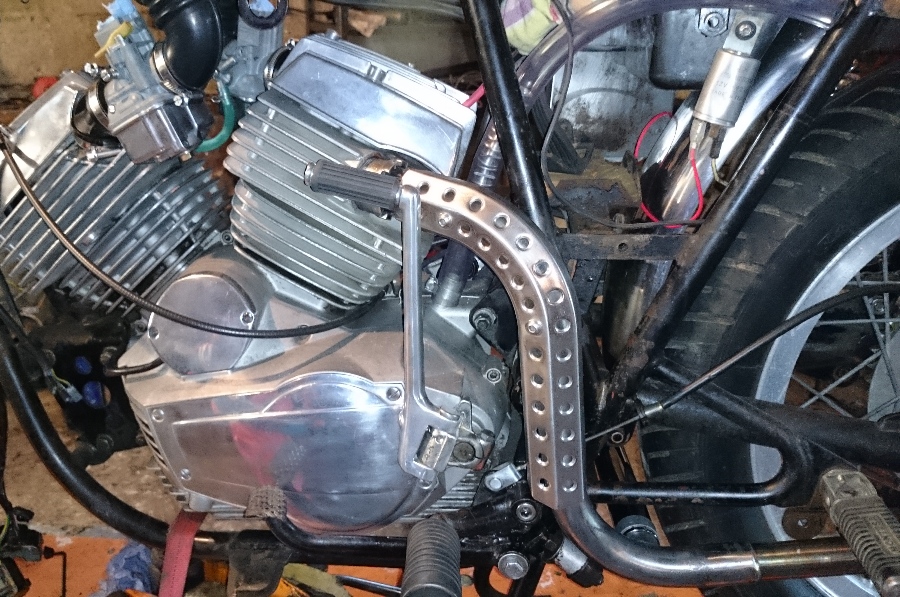
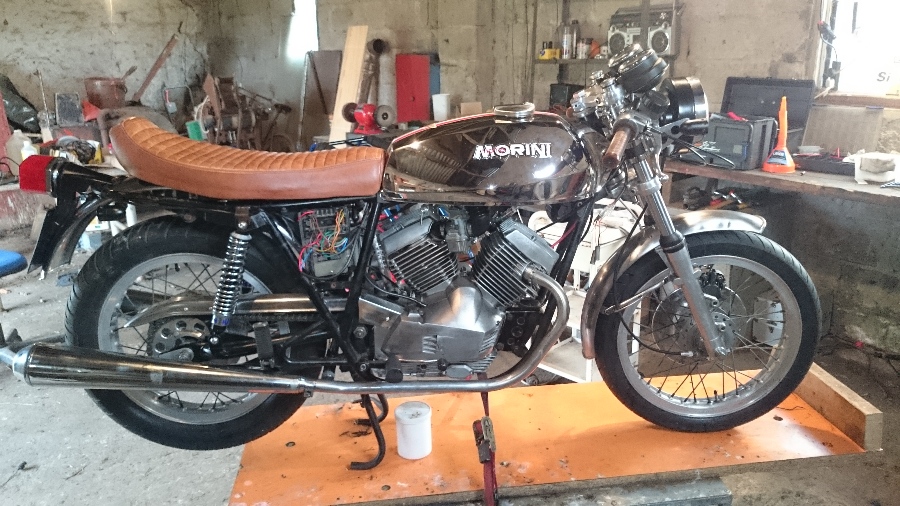
Had a good days work on the Morini for the first time since the early summer. The castled nuts on the bikes exhaust were in a poor state in terms of the threads and the head also looked like it had taken some damage from vibration, most likely caused from the nuts not being tightened fully over time. Also the balance pipe was very badly rusted so I had already ordered a new one from (where else but) NLM before now. I then had the balance pipe chromed to finish the look. The original main exhaust pipes were a bit pitted but worthy or restoration instead of replacement and the heat plate on the rear pots exhaust pipe needed drilled out to have it removed before I could clean it and fit it again with new stainless cap head bolts.
Closer inspection of the castled nuts had me worried due to the thread damage, so very carefully I cleaned out all the threads using a diamond file and in some areas a very fine saw blade to re-cut and clean all the threads as best as possible. I then used the best castled nut with some light oil to carefully clean out the threads on the cylinder head on both pots. That done I cleaned both nuts and sylinder head and applied some none seize copper grease to both. Fitted a new crush washer and presented the exhaust up to each outlet. Using the castled nut tool (again from NLM and worth every penny) I was able to easily tighten up the nuts and get an excellent fit. The proper tool is very important as it gives a lot of feeling to the process.
I don't have a picture to post just now but will add this early next week. I am hopeful to be able to get the time now to finish the bike, at least to point of being able to go for a ride.
My Other Italian V-Twin is an Italian V-Twin
Re: 1977 3.5 Sport Restoration
Hi Paz
We often find damaged threads in the heads. because people are riding with loose pipe nuts. It is very important to tight them up with a heated motor. Every time you take of the pipes you shoud carry that tool with you on the next rides. And every time retighting the nuts when you park the bike as much as you can. Doing this a few times comes the day that you can´t fasten it anymore. Then it is fixed! This is ne of the most important things to know when you begin with a morini
ciao norbert
Re: 1977 3.5 Sport Restoration
So to finish the last post first (?) here is the image of the cleaned and firmly seated rear pot exhaust.
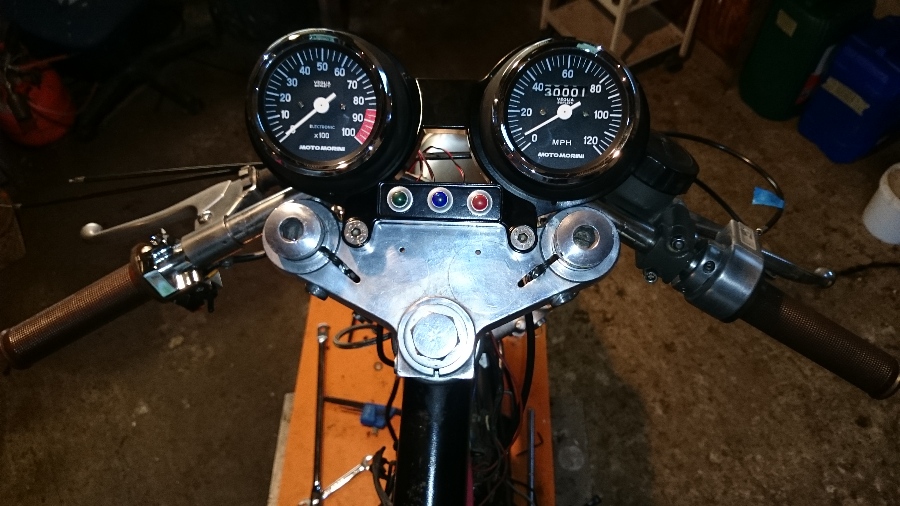
I also started to rebuild up the front dash of the bike at the weekend. The dash lights were in a poor state with the bulb holders being brittle and very loose, I was also unable to source the original internal plastic bulb holders, the replacement ones from NLM were the wrong size and there are no alternatives. So instead I decided to purchased some cheap LED dash lights from China via a well known auction site and stripped them down to use just the LED. I then used black silicon to make a perfect fitting and waterproof plug to hold the LEDs in place inside the original steel holder. This has been a very inexpensive and good long term solution.
The two clocks on the bike a felt needed special treatment and this was not something I was going to attempt myself (I was temped). I also wanted the clocks to run in MPH so after a long chat with the owner, I sent them to Andy Barraclough at Speedy Cables to be overhauled and fully restored. Andy not only restored the clocks but he also changed the gears from plastic to brass, reprinted the clock faces, replaced the glass and bezels, re-geared the speedo to run in MPG, calibrated both clocks and to finish off and at my request, returned to total KM to total Miles. Considering the amount of work carried out, I felt that £145 per clock was a more than fair price and I can honestly say that the clocks looked like new, even the bulb holders and bulbs had been replaced. An excellent job all round.
To the right you can also see the twist-grip which I decided to return to brushed finish with some new stainless cap heads.
My Other Italian V-Twin is an Italian V-Twin
Re: 1977 3.5 Sport Restoration
Finally got the petrol tank sealed this weekend. I used the Caswell kit which worked well. It took all of the product to coat the entire tank inside with approx a cup full draining out at the end. I also found it a little too thick even though it had been at room temp for a few days. That said, after about 25 minutes of rotating the tank I did manage to coat the middle divider in the tank fully.
Seems to be a strong coating so hopefully will renew the tank for future use.
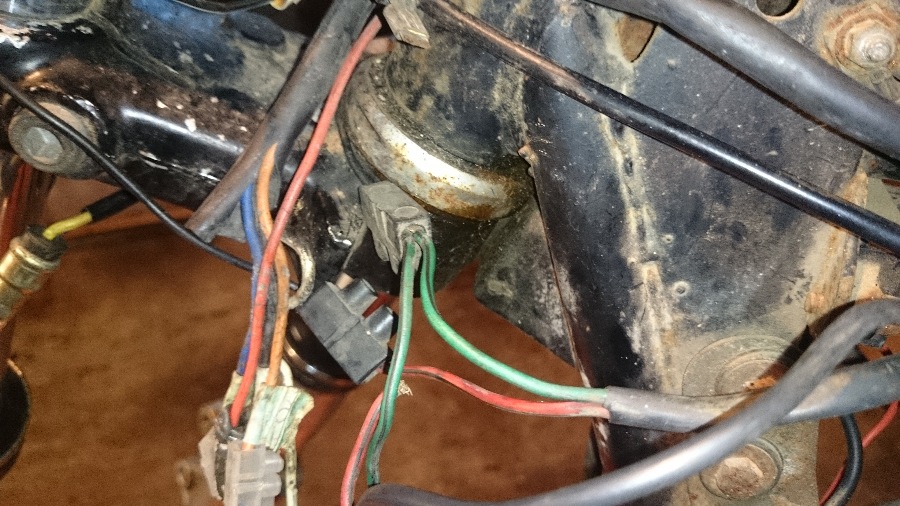
I also managed to get the original horn working again after a stripdown, clean and rebuild. It felt good to be using this crazy huge horn again.
More soon..
Seems to be a strong coating so hopefully will renew the tank for future use.
I also managed to get the original horn working again after a stripdown, clean and rebuild. It felt good to be using this crazy huge horn again.
More soon..
My Other Italian V-Twin is an Italian V-Twin
Re: 1977 3.5 Sport Restoration
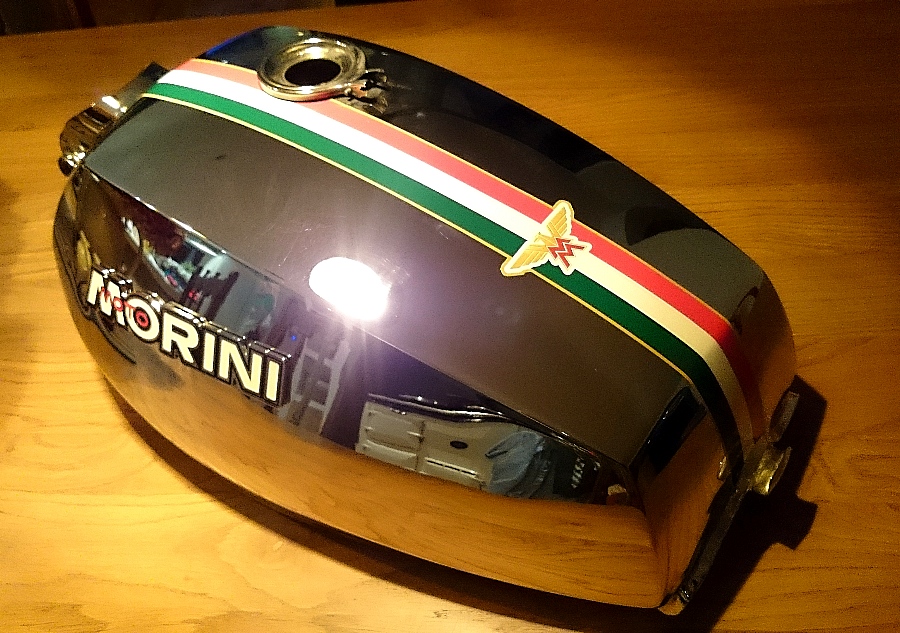
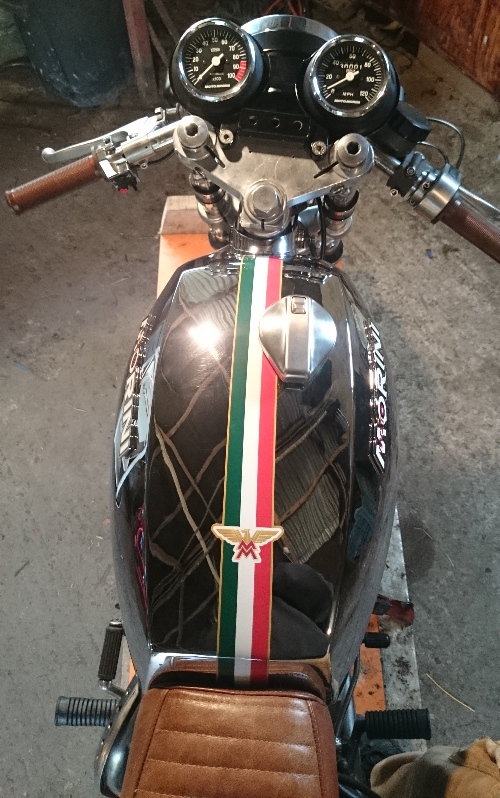
With the tank successfully sealed I finished it off by Fitting the Steel/Enamel side badges with gel tape and creating a new 'Tricolore' tank graphic with the MM as well. The picture is not very good unfortunately, in real life the colours are darker. Do you like?
My Other Italian V-Twin is an Italian V-Twin

Re: 1977 3.5 Sport Restoration
Perhaps it's my rheumy old eyes, but will the badge be 'level' once the tank is on the bike ?
Morini: 1980 2c/375 The Old Gal plus all that remains of the Forgotten Error (the engine)
Gilera: 1957 175 Sport
Honda: 1984 CB250RS
Husqvarna: 2019 401 Svartpilen
Wishlist: 2026 Morini 350
Gilera: 1957 175 Sport
Honda: 1984 CB250RS
Husqvarna: 2019 401 Svartpilen
Wishlist: 2026 Morini 350
Re: 1977 3.5 Sport Restoration
It should be as original as the badge was pinned and the take has the holes for fixing. That said it might be totally wrong when fitted, but if it is then it was designed that way72degrees wrote:Perhaps it's my rheumy old eyes, but will the badge be 'level' once the tank is on the bike ?
My Other Italian V-Twin is an Italian V-Twin
Re: 1977 3.5 Sport Restoration
D'oh - of course. Had to do the same job on the 2C. Just looks odd from that angle - must be the glare from being so shinyPaz2112 wrote:It should be as original as the badge was pinned and the take has the holes for fixing. That said it might be totally wrong when fitted, but if it is then it was designed that way72degrees wrote:Perhaps it's my rheumy old eyes, but will the badge be 'level' once the tank is on the bike ?
Lovely job, I particularly like the cunning dodge with the idiot lights.
Morini: 1980 2c/375 The Old Gal plus all that remains of the Forgotten Error (the engine)
Gilera: 1957 175 Sport
Honda: 1984 CB250RS
Husqvarna: 2019 401 Svartpilen
Wishlist: 2026 Morini 350
Gilera: 1957 175 Sport
Honda: 1984 CB250RS
Husqvarna: 2019 401 Svartpilen
Wishlist: 2026 Morini 350
Re: 1977 3.5 Sport Restoration
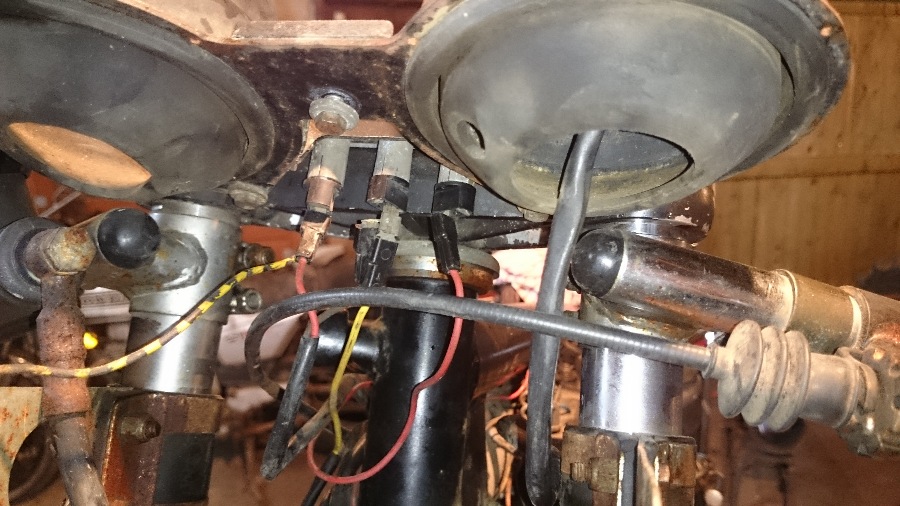
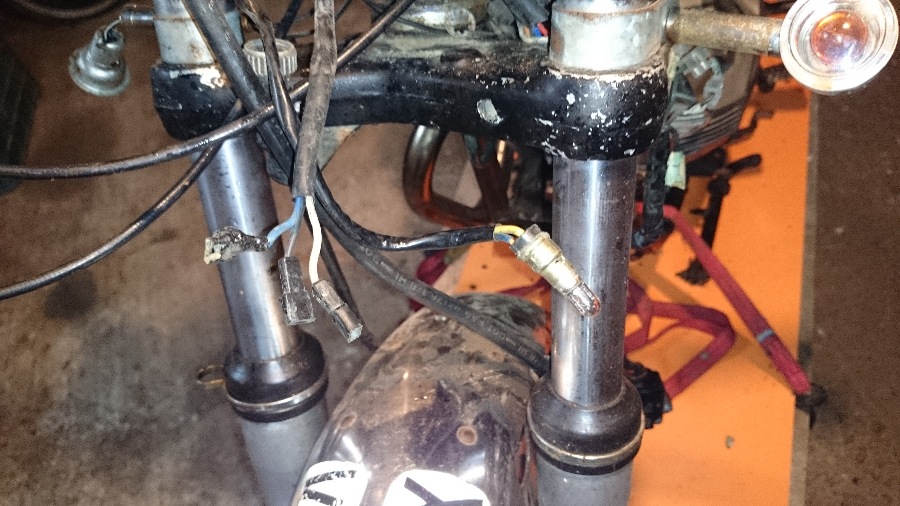
It has been a while since I last posted but I eventually got the time I needed to tackle the awful wiring on my Morini. It was no doubt perfectly fine when it left the Morini factory, however, years of tinkering by someone who must have been somewhat technically challenged had left the wiring, lights and switches in a dreadful condition. All that I could do was to rewire the majority of the bike. On top of this the original switchgear had been replaced by a Yamaha set but connected using choc bloc connectors and insulation tape. Some of the power wires from the bike had been stripped back and additional feeds taken from them by twisting the new wire around the exposed strip  . To make things worse the dash lights did not make any sense at all, I made the mistake of trying to compare what I was seeing to what was on the wiring diagram for the bike. It took me a while but I soon realised to simply cut out and ignore what was there and use the wiring diagram to do it properly myself.
Just make it up as you go along, seemed to be the method used by a previous owner.
Incorrect bulb choices along with a poorly fitted switchgear from a yamaha fried lots of the connections.
Why use bullet or spade connectors when choc bloc connectors are so good
First stop after stripping was to take a visit to http://www.vehicle-wiring-products.eu/ and start my shopping list. They were very helpful and better priced that most. They also have an amazing selection of older materials needed. I then also ordered a replacement key and switch from NLM as mine (like a lot of peoples) refused to hold the keys in place and I didn't fancy someone starting my bike with a screwdriver. I replaced the loom to the rev counter, remade the loom from the headlamp (now with indicators and pilot light) back to the bike and then also made a loom to the dash lights and speedo lights. Next came the horn, fuel relay, indicator relay, new HT leads and new main power from switch to from block.
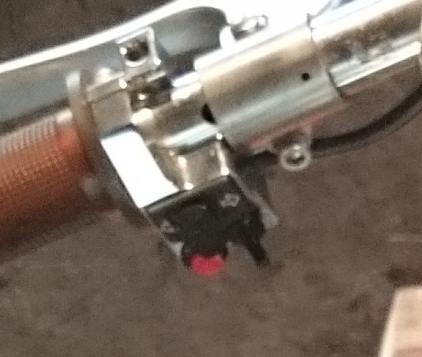
I needed to replace the switchgear but because I was not creating a 'restored' bike I fancied something smaller and less obtrusive. I opted for a CNC alloy switch from kickstarter.de and I am happy with how it looks. Horn, indicators, low and high beam are all catered for. I made up an 8pin mullticonnector for this switch then the opposite fit for the bike side. All in all I am very happy with the new wiring, it is very tidy and with the tank on only the red HT leads are visible.
Once the wiring was tested (with a new battery) and a few adjustments made (I wired the dash light for high beam the wrong way round so low beam gave me the blue light, oops) I was ready to try and start the bike for the first time since last year. Considering I have stripped and refurbished both carbs, rewired the electrics and set the tappets, I wasn't hopeful of much initially. I linked up the cards and tank with new pipe and poured in some petrol. To my delight she fired up on the 6th kick and ran very smoothly indeed. I let her warm up and everything seems well, exhaust ports and now tight, throttle response is really good and a lot better than I remember last year. I now need to dig out my carb balancer this weekend and set the carbs. The problem is that I don't see any ports on the replacement rubber inlet ports. Does anyone have any suggestions on how to fit some on the morini?
The SPORT badge still needs fitted and the rebuilt forks need their oil.
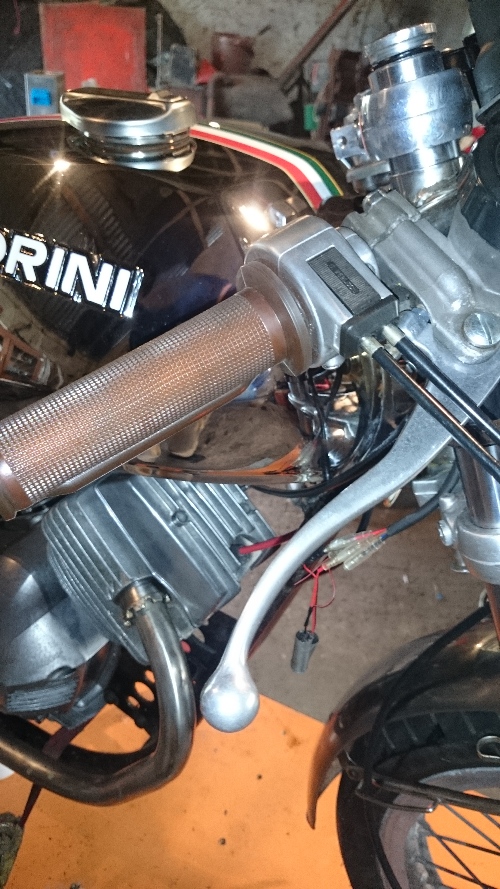
I am particularly proud of how the Tommaselli twist grip came out. It was originally sprayed black and was missing the plastic cable guides (impossible to find). I stripped it and ran it though the sonic bath to properly clean the parts. I then cleaned it with a scotchbrite wheel to leave the surface brushed looking but not polished. I then stumbled upon the exact Tommaselli plastic cable guide while rummaging through several boxes of parts that came with the bike when I purchased it, result!
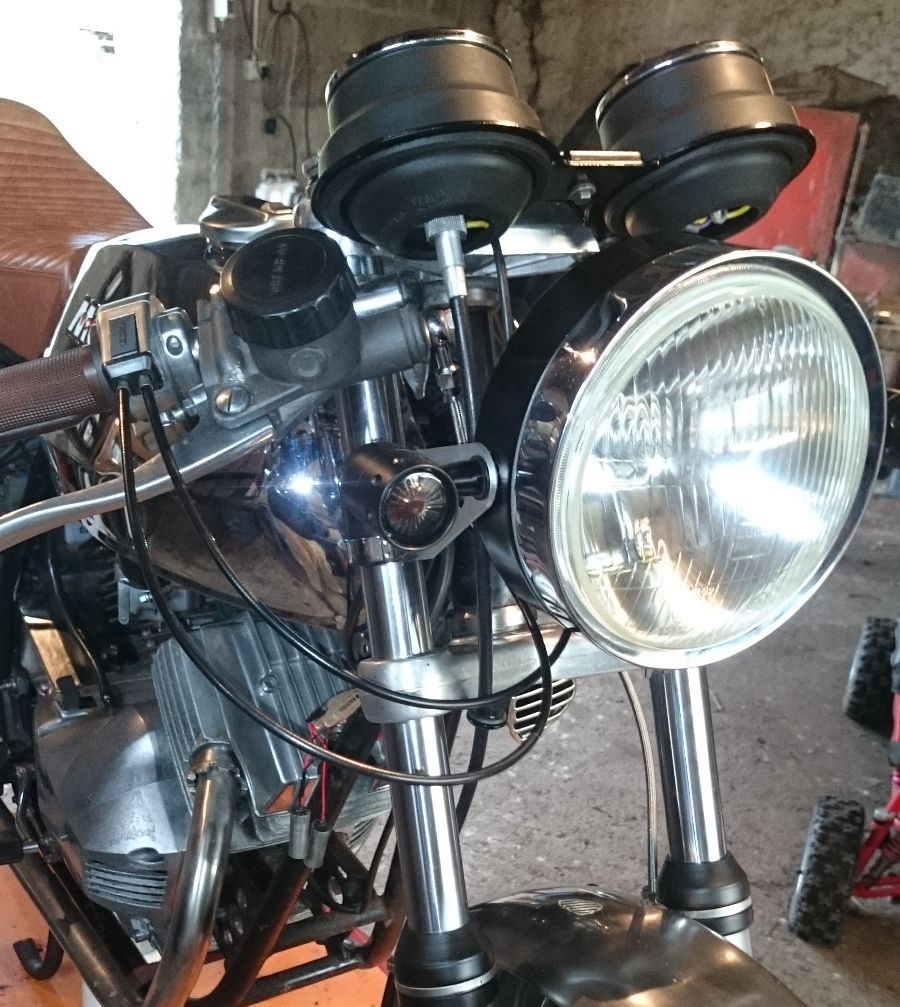
The indicators I cut and mounted through the newly machined aluminium headlight arms. These were attached to the original fork mounts. The headlight is original and fully restored. I powercoated the back of the light and had the retaining ring re-chromed. You can also see the rebult Grimica brake and lever. The rubber cups that the clocks sit into were restored by cleaning them well with soap and water and then smothering them in Autoglym rubber food, wrapping them in cling film and leaving them for the winter. When I removed them from their winter hibernation they looked better than new. Bottom and top yolk were cleaned (not polished), finally the speedo cable and headlight lens are new.
So this weekend I hope to measure up the side panels for making a replacement pair. I don't want to restore the originals as they cover the rear pot and I think that a triangular panel following the lines of the frame would look a lot better. I also will be replacing all liquids and hopefully getting the first short run to check brakes and the like.
More images soon, once the bike is in a better looking environment.
Just make it up as you go along, seemed to be the method used by a previous owner.
Incorrect bulb choices along with a poorly fitted switchgear from a yamaha fried lots of the connections.
Why use bullet or spade connectors when choc bloc connectors are so good
First stop after stripping was to take a visit to http://www.vehicle-wiring-products.eu/ and start my shopping list. They were very helpful and better priced that most. They also have an amazing selection of older materials needed. I then also ordered a replacement key and switch from NLM as mine (like a lot of peoples) refused to hold the keys in place and I didn't fancy someone starting my bike with a screwdriver. I replaced the loom to the rev counter, remade the loom from the headlamp (now with indicators and pilot light) back to the bike and then also made a loom to the dash lights and speedo lights. Next came the horn, fuel relay, indicator relay, new HT leads and new main power from switch to from block.
I needed to replace the switchgear but because I was not creating a 'restored' bike I fancied something smaller and less obtrusive. I opted for a CNC alloy switch from kickstarter.de and I am happy with how it looks. Horn, indicators, low and high beam are all catered for. I made up an 8pin mullticonnector for this switch then the opposite fit for the bike side. All in all I am very happy with the new wiring, it is very tidy and with the tank on only the red HT leads are visible.
Once the wiring was tested (with a new battery) and a few adjustments made (I wired the dash light for high beam the wrong way round so low beam gave me the blue light, oops) I was ready to try and start the bike for the first time since last year. Considering I have stripped and refurbished both carbs, rewired the electrics and set the tappets, I wasn't hopeful of much initially. I linked up the cards and tank with new pipe and poured in some petrol. To my delight she fired up on the 6th kick and ran very smoothly indeed. I let her warm up and everything seems well, exhaust ports and now tight, throttle response is really good and a lot better than I remember last year. I now need to dig out my carb balancer this weekend and set the carbs. The problem is that I don't see any ports on the replacement rubber inlet ports. Does anyone have any suggestions on how to fit some on the morini?
The SPORT badge still needs fitted and the rebuilt forks need their oil.
I am particularly proud of how the Tommaselli twist grip came out. It was originally sprayed black and was missing the plastic cable guides (impossible to find). I stripped it and ran it though the sonic bath to properly clean the parts. I then cleaned it with a scotchbrite wheel to leave the surface brushed looking but not polished. I then stumbled upon the exact Tommaselli plastic cable guide while rummaging through several boxes of parts that came with the bike when I purchased it, result!
The indicators I cut and mounted through the newly machined aluminium headlight arms. These were attached to the original fork mounts. The headlight is original and fully restored. I powercoated the back of the light and had the retaining ring re-chromed. You can also see the rebult Grimica brake and lever. The rubber cups that the clocks sit into were restored by cleaning them well with soap and water and then smothering them in Autoglym rubber food, wrapping them in cling film and leaving them for the winter. When I removed them from their winter hibernation they looked better than new. Bottom and top yolk were cleaned (not polished), finally the speedo cable and headlight lens are new.
So this weekend I hope to measure up the side panels for making a replacement pair. I don't want to restore the originals as they cover the rear pot and I think that a triangular panel following the lines of the frame would look a lot better. I also will be replacing all liquids and hopefully getting the first short run to check brakes and the like.
More images soon, once the bike is in a better looking environment.
My Other Italian V-Twin is an Italian V-Twin
Re: 1977 3.5 Sport Restoration
If your carbs have the vacuum tube that runs between the two of them, you can unplug that and fit vacuum gauges to the carbs in its place.
Here's a picture I prepared earlier:

Here's a picture I prepared earlier:
Morini stuff on RealClassic.co.uk: http://www.realclassic.co.uk/profiles.html#morini
Re: 1977 3.5 Sport Restoration
Drill holes in the provided boss. Make press in plugs for the holes.I now need to dig out my carb balancer this weekend and set the carbs. The problem is that I don't see any ports on the replacement rubber inlet ports. Does anyone have any suggestions on how to fit some on the morini?
Paul Compton
http://www.morini-mania.co.uk
http://www.youtube.com/user/EVguru
http://www.morini-mania.co.uk
http://www.youtube.com/user/EVguru
Re: 1977 3.5 Sport Restoration
EVguru wrote:Drill holes in the provided boss. Make press in plugs for the holes.I now need to dig out my carb balancer this weekend and set the carbs. The problem is that I don't see any ports on the replacement rubber inlet ports. Does anyone have any suggestions on how to fit some on the morini?
Paul, what did you make the plugs from?
My Other Italian V-Twin is an Italian V-Twin
Re: 1977 3.5 Sport Restoration
Precision ground 400 series stainless steel rod.Paz2112 wrote:Paul, what did you make the plugs from?
Or to put it another way, material salvaged from an old inkjet or laser printer.
Paul Compton
http://www.morini-mania.co.uk
http://www.youtube.com/user/EVguru
http://www.morini-mania.co.uk
http://www.youtube.com/user/EVguru
Re: 1977 3.5 Sport Restoration
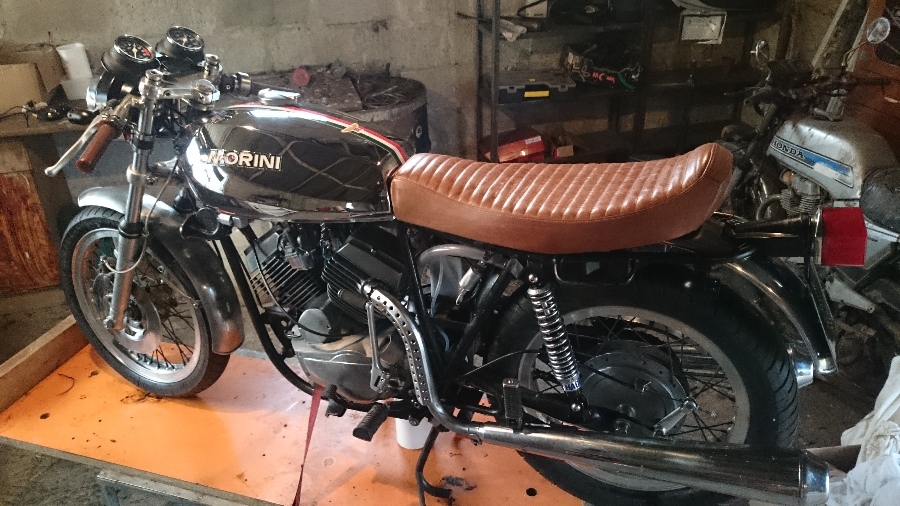
So I eventually had a run on my 350 Sport after a full year waiting, fixing and restoring. I only went approx 6 miles or so but this is what I found (all advise, help and warnings appreciated)
The bike is so light and nimble it begs to be leaned into corners.
I had OK throttle response up to 5000 revs or so then a hesitation until I got to 6000 where upon things opened up again. I suspect that carbs are not properly balanced and also the mixture may be a little rich.
I had initially what felt like a good clutch but after about 6 miles it seemed to shorten and only had bite at the last of the lever. I also suspect that I was having a little clutch slip in the initial pull in higher gears 4th 5th. Adjustment might be all that is required.
The noise is suitably throaty and enjoyable to listen to, nice induction roar as well.
My tyres are 10+ years old so I could not get silly in the corners but the bike just loves to be leaned over (I know you all already know this)
All in all I am very pleased with myself, there is a lot of adjustments to be made but the bike is running well. Considering the state it was in when I received it I was happy for it just to start. I would welcome the collective knowledge of you all as to where to start with fine tuning and also what to look out for.
p.s. Does anyone know a good place in Northern Ireland to get my wheels re-spoked?
My Other Italian V-Twin is an Italian V-Twin